Bring Up: CANivore
Warning
This documentation is out of date. We recommend following the Phoenix 6 CANivore documentation for configuring and managing CANivores; this is compatible with Phoenix 5.
Supported systems
Currently, the following systems are supported for CANivore development:
roboRIO
Windows (x86-64)
Linux desktop (x86-64)
Raspberry Pi (ARM 64-bit)
NVIDIA Jetson
Note
Custom bit rates and CAN 2.0 are not supported at this time. The parameters passed into SocketCAN are not applied by the firmware.
Non-FRC Linux Kernel Module
On non-FRC Linux systems, the canivore-usb kernel module must be installed to add SocketCAN support for the CANivore.
The kernel module is distributed through APT. Follow the Phoenix 6 Non-FRC Installation guide to install the kernel module.
Tip
To get a robot application up and running quickly, check out our Phoenix 5 SocketCAN Example.
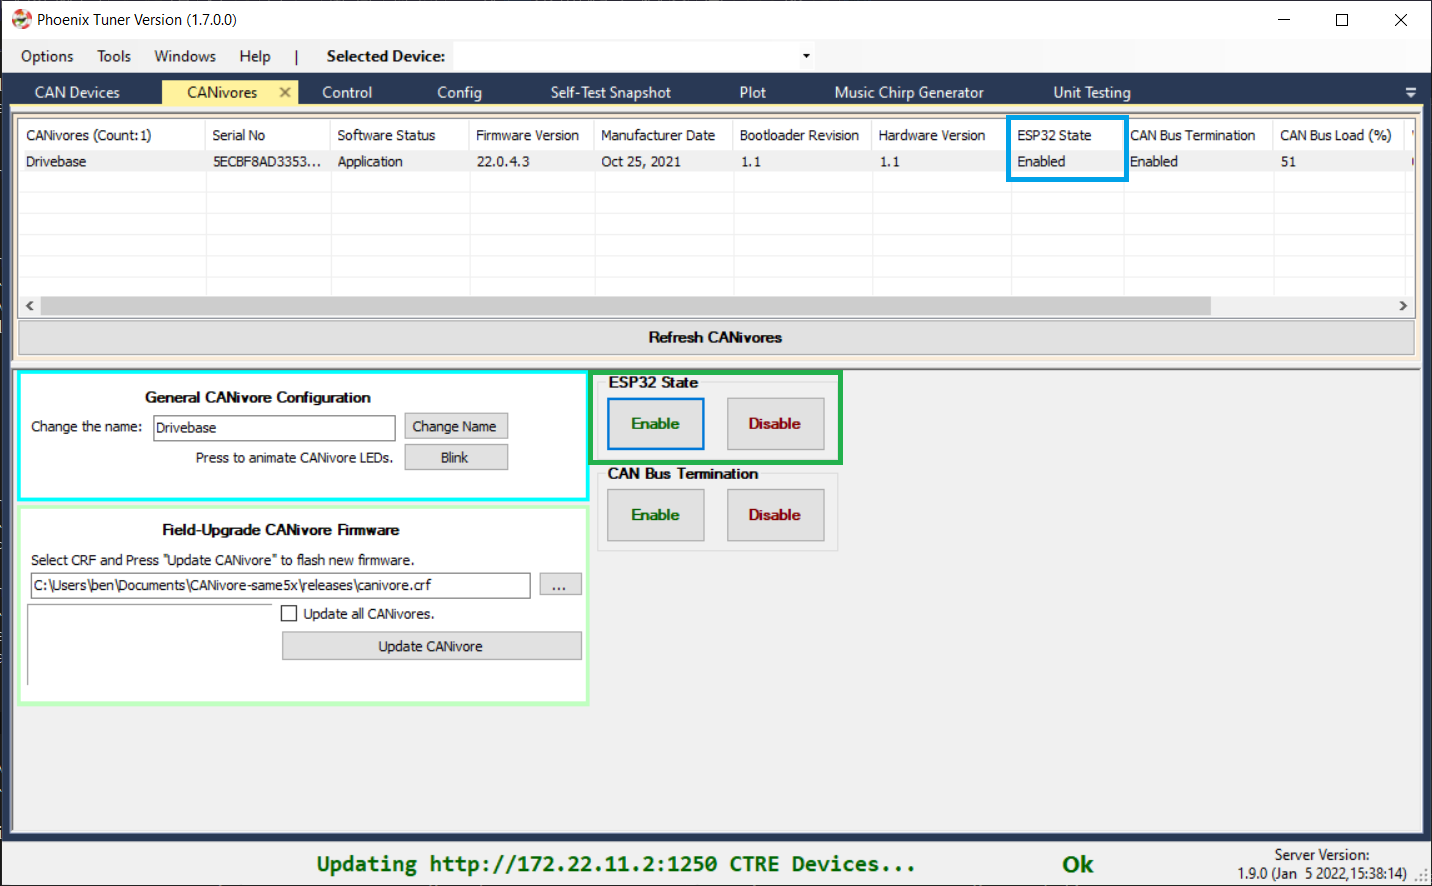
View attached CANivores
Open Phoenix Tuner, go to the CANivores tab, and click on the Refresh CANivores button to get a list of CANivores attached to the target system. You can specify the target system in the Robot Controller Install tab.
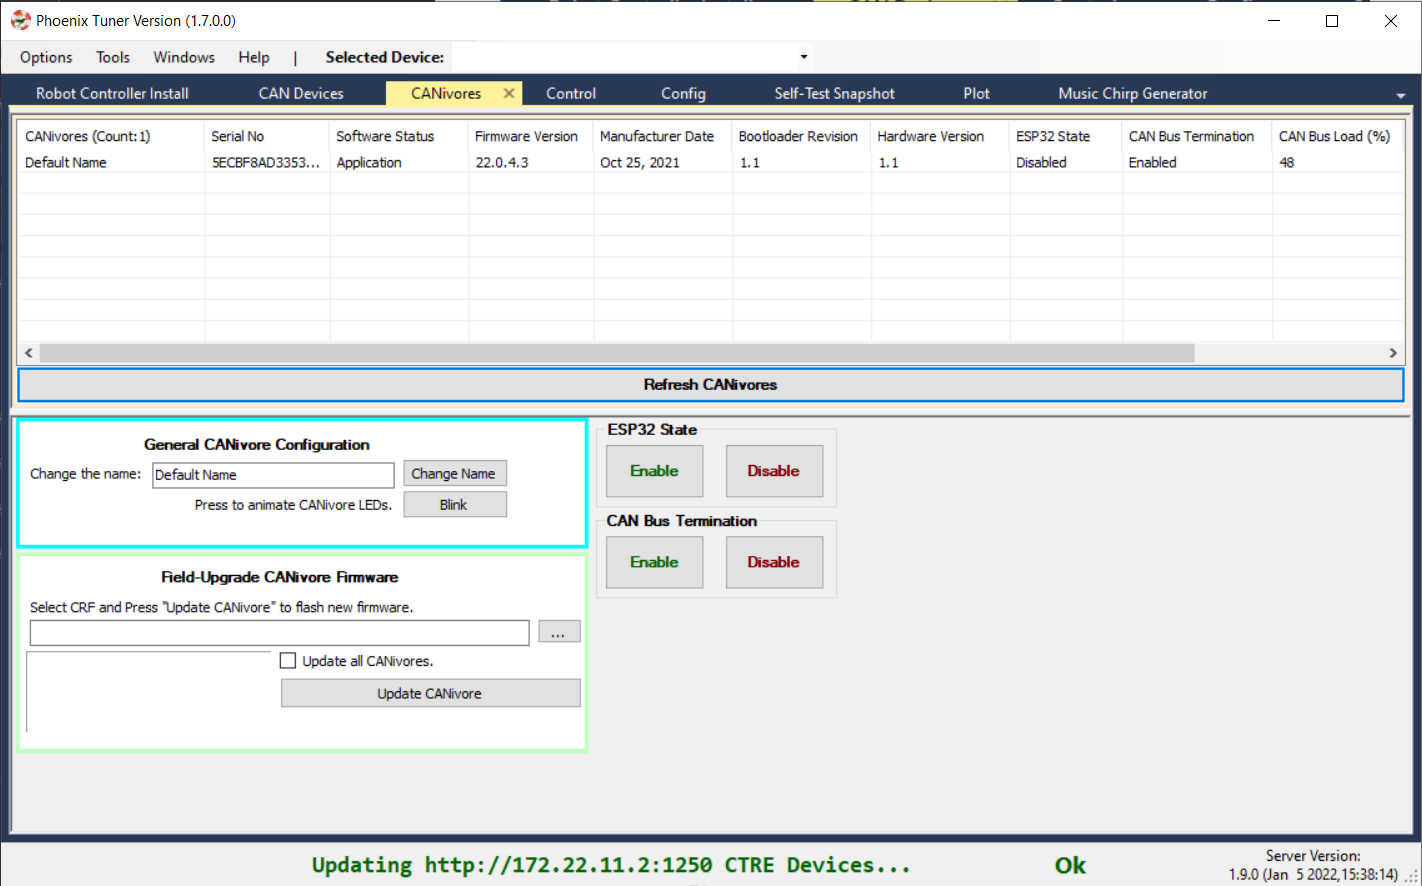
Note
The Phoenix Diagnostic Server must be running on the target system to use the CANivores page.
Note
The CANivores tab does not work on non-FRC Linux systems. This will be fixed in a future update. As a workaround, you can use the caniv CLI to configure your CANivores.
Tip
There is a modernized version called Tuner X that is available for Windows and Android devices (works with Phoenix 5 and Phoenix 6).
Tip
If you are connecting to CANivores on your local Windows machine, there is a CANivore-usb option in the Diagnostic Server Address dropdown.
This option runs a diagnostic server within Tuner so you do not need to run a robot project to communicate with CANivores.

Field upgrade CANivores
In the CANivores tab of Phoenix Tuner, select the CANivore you wish to update. Select the CRF under the Field-upgrade section then press Update Device. The CRFs are available in multiple places, and likely are already on your PC. See section Device Firmware Files (crf).
If you wish to update all attached CANivores, check Update all CANivores. If a CANivore field-upgrade fails, then the operation will complete. Confirm Firmware Version column in the device list after field-upgrade.

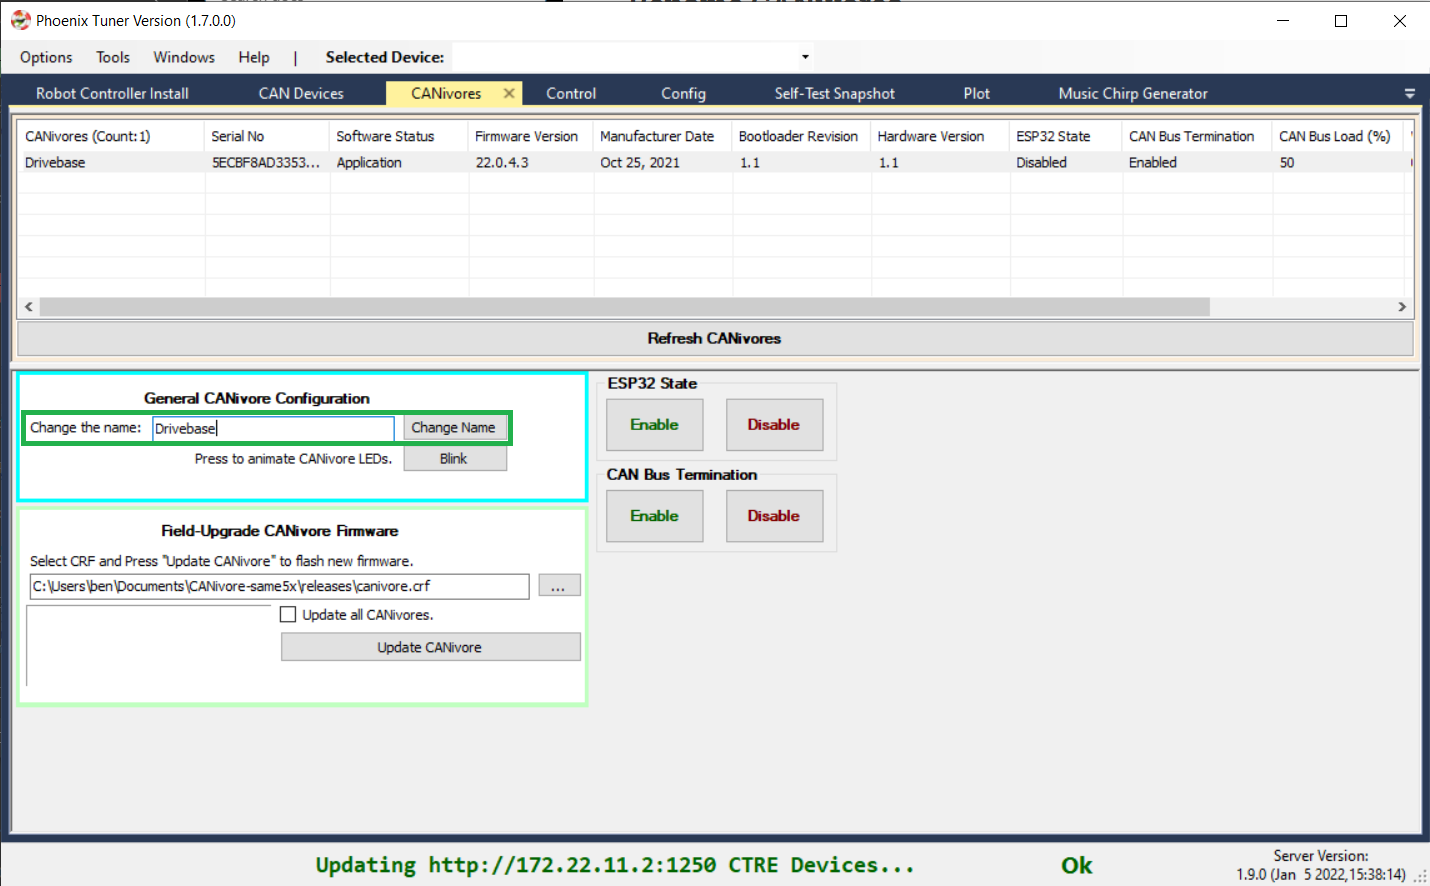
Rename CANivores
CANivores can be given custom names for use within a robot program. Select the CANivore you wish to rename. Under the General CANivore Configuration section, set the new name and click “Change Name”.
Note
CANivore names cannot be longer than 32 characters.
Note
To re-default the custom name, clear the “Name” text entry so it is blank and press “Change Name”.
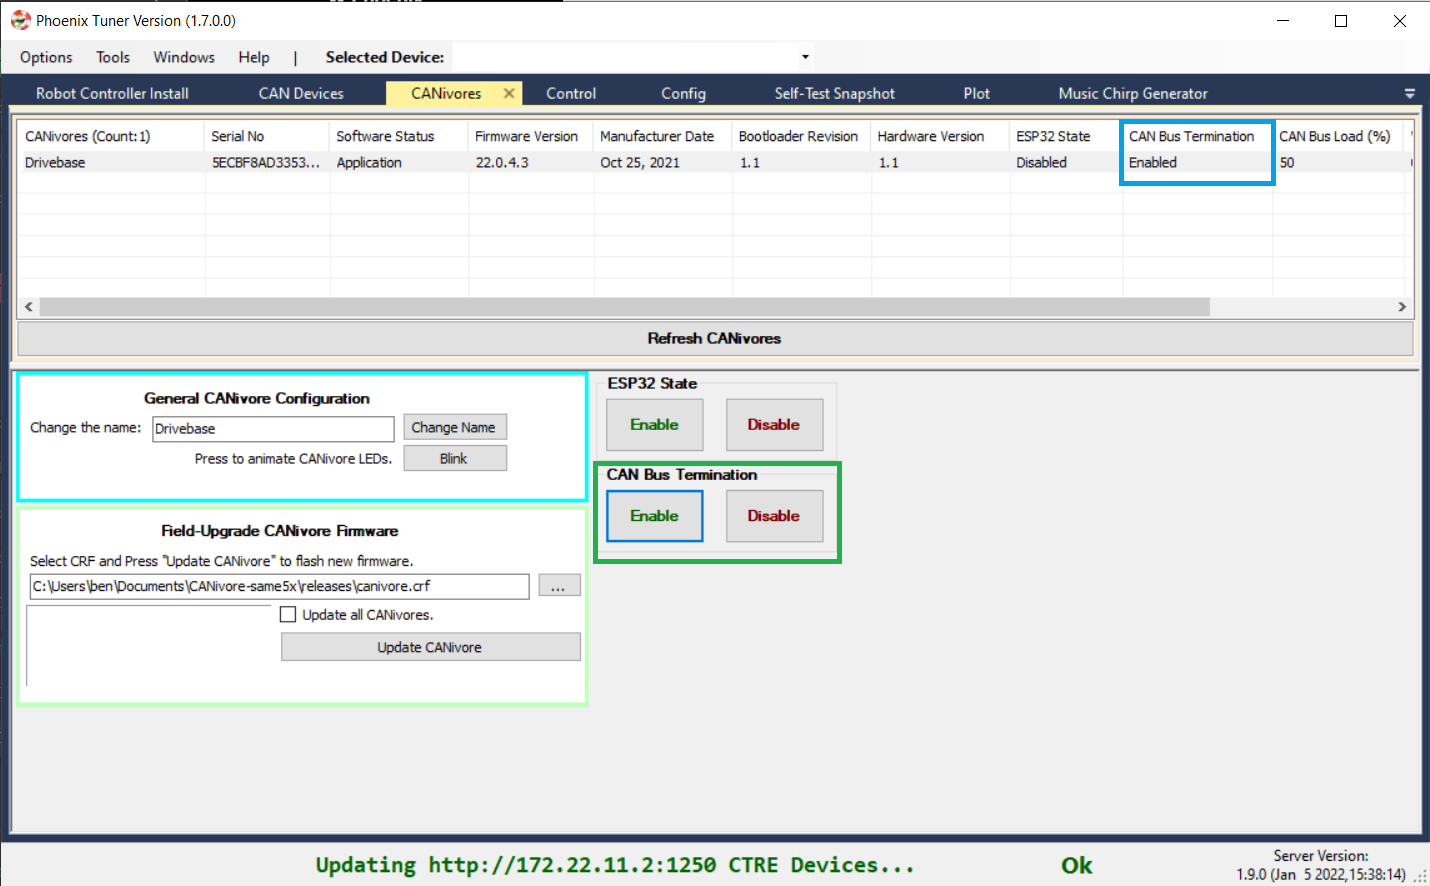
Configure CAN bus termination
The CANivore has a 120-ohm programmable resistor for terminating the CAN bus. The resistor can be configured using the CAN Bus Termination Enable and Disable buttons in the CANivores tab of Phoenix Tuner. The current state of the terminating resistor can be seen in the “CAN Bus Termination” column of the list of CANivores.
Note
A CAN bus requires two terminating resistors - one at each extreme end. If only one is present, communication over CAN may fail.
Configure ESP32
The CANivore includes an ESP32 module which provides the ability to run custom code, which in turn allows access to Wi-Fi and Bluetooth features. By default, the ESP32 is disabled and held in reset. Users can enable the ESP32 via Phoenix Tuner so that it is allowed to run.
CANivore provides a software USB COM port, which typical ESP32 software tools can use to deploy and debug.
Examples will be coming soon!
The current state of the ESP32 can be seen in the “ESP32 State” column of the list of CANivores.
Tip
For convenience, the software USB COM port is always available and can be used to deploy an ESP32 application even if setting is disabled. However ESP will not boot up after power reset if setting is disabled.
Warning
FRC rules typically require that no device is allowed to emit wireless signals during an FRC competition. Teams are encouraged to read the latest game rules and disable ESP32 during competition use if need be.
CANivore API
In the constructors for CANivore-compatible CAN devices, there is an optional string parameter to set the device’s CAN bus. This string can be the CANivore’s name or serial number. On non-FRC Linux systems, this string can also be a SocketCAN interface.
If no CAN bus string is passed into the constructor, or the CAN bus string is empty:
On the roboRIO, the system will use the roboRIO native CAN bus.
On Windows, the system will use the first CANivore found. (Requires Phoenix 5.22+)
On non-FRC Linux systems, the system will use SocketCAN interface
can0.
Note
If there are multiple CANivores with the same name, the system will use the first CANivore found.
Note
You can explicitly specify that a device should use the roboRIO native CAN bus by passing down “rio” or “roborio”.
TalonFX fx_default = new TalonFX(0); // This constructs a TalonFX on the RIO native CAN bus
TalonFX fx_rio = new TalonFX(1, "rio"); // This constructs a TalonFX on the RIO native CAN bus
TalonFX fx_drivebase = new TalonFX(0, "Drivebase"); // This constructs a TalonFX on the CANivore bus named "Drivebase"
CANCoder cc_elevator = new CANCoder(0, "Elevator"); // This constructs a CANCoder on the CANivore bus named "Elevator"
CANivore Status Prints
When working with CANivore CAN buses in a robot program, Phoenix prints some messages to report the state of the CANivore connection. These messages can be useful to debug connection issues (bad USB vs bad CAN) or report bugs to CTR Electronics.
Message |
Connection Status |
|---|---|
CANbus Failed to Connect |
Could not connect to a CANivore with the given name or serial number |
CANbus Connected |
Successfully found and connected to the CANivore with the given name or serial number |
CANbus Disconnected |
Detected that a CANivore USB device has been disconnected |
Message |
Bring-up Status |
|---|---|
CANbus Failed Bring-up |
Found and connected to the CANivore, but could not configure the device or start the network |
CANbus Successfully Started |
Successfully configured the CANivore and started the network |
Message |
Network State |
|---|---|
CANbus Network Down |
Linux: The SocketCAN network has been deactivated, USB-to-CAN activity has stopped
Windows: Could not open the communication channels for USB-to-CAN traffic
|
CANbus Network Up |
Linux: The SocketCAN network has been activated, USB-to-CAN activity has resumed
Windows: Successfully opened the communication channels for USB-to-CAN traffic
|
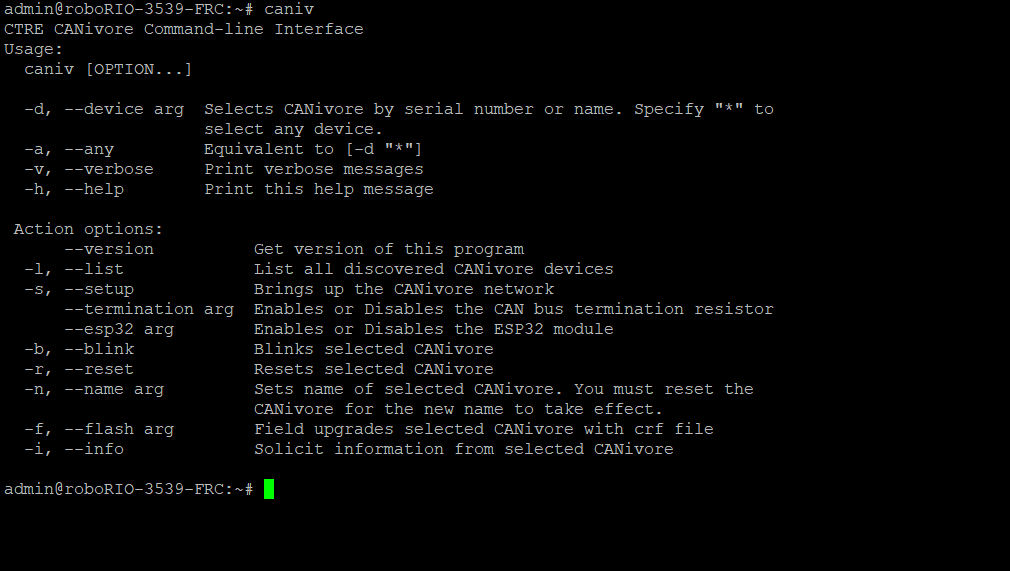
caniv - CANivore CLI
caniv is a Command-line Interface (CLI) to interact with CANivores outside of Phoenix Tuner.
The latest caniv is already installed on the target system with the installation of the canivore-usb kernel module.
Note
Unlike the CANivores page in Phoenix Tuner, caniv does not require a running Phoenix Diagnostic Server.
On Linux systems (including the roboRIO), caniv can be found at /usr/local/bin. On Windows systems, the program
is in the Phoenix Tuner install location, under Binary\windows\ctre.
To view a list of available commands, run caniv either with no parameters or with --help.